Explained step by step: Assembly instructions for your bike or e-bike
![](https://www.mhw-bike.com/magazine/wp-content/uploads/2021/04/21-aufbau-pedal-links-anschrauben-1000x500.jpg)
With these instructions you can assemble your delivered bike yourself in a few minutes.
![Explained step by step: Assembly instructions for your bike or e-bike 02 aufbau schutz entfernen 1 - Explained step by step: Assembly instructions for your bike or e-bike](https://mhw-bike.com/magazine/wp-content/uploads/2021/04/02-aufbau-schutz-entfernen-1.jpg)
Remove the cable ties
![Explained step by step: Assembly instructions for your bike or e-bike 03 aufbau schutz entfernen 2 - Explained step by step: Assembly instructions for your bike or e-bike](https://mhw-bike.com/magazine/wp-content/uploads/2021/04/03-aufbau-schutz-entfernen-2.jpg)
Remove protective components
![Explained step by step: Assembly instructions for your bike or e-bike 06 aufbau schutzkappe entfernen 1 - Explained step by step: Assembly instructions for your bike or e-bike](https://mhw-bike.com/magazine/wp-content/uploads/2021/04/06-aufbau-schutzkappe-entfernen-1.jpg)
Remove front protective caps
![Explained step by step: Assembly instructions for your bike or e-bike 08 aufbau schutz hinterachse entfernen - Explained step by step: Assembly instructions for your bike or e-bike](https://mhw-bike.com/magazine/wp-content/uploads/2021/04/08-aufbau-schutz-hinterachse-entfernen.jpg)
Remove rear protective caps
![Explained step by step: Assembly instructions for your bike or e-bike 10 aufbau vorbau aufschrauben 1 - Explained step by step: Assembly instructions for your bike or e-bike](https://mhw-bike.com/magazine/wp-content/uploads/2021/04/10-aufbau-vorbau-aufschrauben-1.jpg)
Unscrewing the stem
Open the stem with a 5 mm Allen key to be able to remove the handlebar clamp.
![Explained step by step: Assembly instructions for your bike or e-bike 13 aufbau lenker einsetzen - Explained step by step: Assembly instructions for your bike or e-bike](https://mhw-bike.com/magazine/wp-content/uploads/2021/04/13-aufbau-lenker-einsetzen.jpg)
Inserting the handlebars
Centre the handlebars.
![Explained step by step: Assembly instructions for your bike or e-bike 15 aufbau lenker zuschrauben zentrieren - Explained step by step: Assembly instructions for your bike or e-bike](https://mhw-bike.com/magazine/wp-content/uploads/2021/04/15-aufbau-lenker-zuschrauben-zentrieren.jpg)
Align the handlebars centrally
![Explained step by step: Assembly instructions for your bike or e-bike 14 aufbau lenker zuschrauben - Explained step by step: Assembly instructions for your bike or e-bike](https://mhw-bike.com/magazine/wp-content/uploads/2021/04/14-aufbau-lenker-zuschrauben.jpg)
Tightening the stem
Fit the handlebar clamp and tighten all four bolts evenly and firmly.
![Explained step by step: Assembly instructions for your bike or e-bike 16 aufbau schutz bremse entfernen - Explained step by step: Assembly instructions for your bike or e-bike](https://mhw-bike.com/magazine/wp-content/uploads/2021/04/16-aufbau-schutz-bremse-entfernen.jpg)
Remove the transport lock
![Explained step by step: Assembly instructions for your bike or e-bike 17 aufbau schutz achse entfernen - Explained step by step: Assembly instructions for your bike or e-bike](https://mhw-bike.com/magazine/wp-content/uploads/2021/04/17-aufbau-schutz-achse-entfernen.jpg)
Remove fork guard
![Explained step by step: Assembly instructions for your bike or e-bike Schnellspanner Steckachse magazin - Explained step by step: Assembly instructions for your bike or e-bike](https://www.mhw-bike.com/magazine/wp-content/uploads/2021/04/Schnellspanner-Steckachse-magazin.jpg)
If necessary: Insert front wheel
Insert the front wheel straight, exactly to the stop, into the dropouts and tighten the quick release or thru axle. Pay attention to the running direction of the tire.
![Explained step by step: Assembly instructions for your bike or e-bike 19 aufbau sattel einsetzen - Explained step by step: Assembly instructions for your bike or e-bike](https://mhw-bike.com/magazine/wp-content/uploads/2021/04/19-aufbau-sattel-einsetzen.jpg)
Inserting the saddle
Loosen the seat post clamp on the seat tube. Insert the seat post straight into the seat tube without twisting.
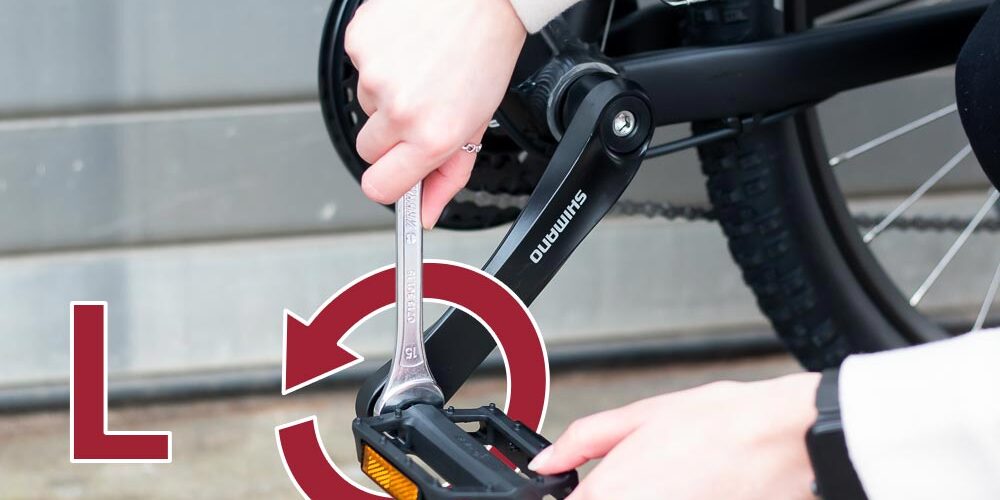
![Explained step by step: Assembly instructions for your bike or e-bike 20 aufbau pedal beschriftung - Explained step by step: Assembly instructions for your bike or e-bike](https://mhw-bike.com/magazine/wp-content/uploads/2021/04/20-aufbau-pedal-beschriftung.jpg)
Pedals Marking
Each pedal has a small mark(L and R) indicating on which side of the wheel the pedal should be mounted. The markings can be in different places.
Attention! Do not mix up the left and right pedals. Please read the information sheet.
![Explained step by step: Assembly instructions for your bike or e-bike 21 aufbau pedal links anschrauben - Explained step by step: Assembly instructions for your bike or e-bike](https://mhw-bike.com/magazine/wp-content/uploads/2021/04/21-aufbau-pedal-links-anschrauben.jpg)
Fitting the left pedal
The left pedal has a left-hand thread. Tighten the pedal firmly with a 15 mm open-end spanner to approx. 35 Nm.
![Explained step by step: Assembly instructions for your bike or e-bike 22 aufbau pedal rechts anschrauben - Explained step by step: Assembly instructions for your bike or e-bike](https://mhw-bike.com/magazine/wp-content/uploads/2021/04/22-aufbau-pedal-rechts-anschrauben.jpg)
Fitting the right-hand pedal
The right-hand pedal has a right-hand thread. Tighten the pedal with a 15 mm spanner to approx. 35 Nm.
![Explained step by step: Assembly instructions for your bike or e-bike 23 aufbau fertig - Explained step by step: Assembly instructions for your bike or e-bike](https://mhw-bike.com/magazine/wp-content/uploads/2021/04/23-aufbau-fertig.jpg)
Test drive
Take the correct tyre pressure from the operating instructions and check the tyre pressure. Afterwards, please do a test drive and tighten the pedals again.
Please note: The information given here is for guidance only. The manufacturer‘s instructions are always binding.
If the brakes drag
Remove the front wheel, rotate the axle 90° and reinsert it to the stop. If the problem persists, turn another 90°.
Recent Comments